
Last Updated on September 5, 2023
So, you’ve just purchased your first Razer device, and you can’t wait to unleash its full potential on your Mac. You eagerly unbox it, plug it in, and excitedly prepare to install the software. However, you hit a roadblock when you discover that the software needed to set up RGB lighting and customize button bindings for your mouse is not available for Mac OS. But don’t panic just yet! With a little assistance from third-party software, we’ll guide you through the process of getting your Razer products working seamlessly on your Mac OS device.
In this comprehensive guide, we’ve explored the steps to set up Razer products on Mac, the advantages of using Razer peripherals, and answered frequently asked questions about Razer compatibility with Mac OS. We hope this information empowers you to make the most of your Razer devices in your Mac environment. Enjoy your enhanced computing experience!
Setting Up Razer Mac OS Software

The first crucial step in this journey is installing the Razer Mac OS software. This program will be your primary tool for customizing the RGB lighting effects on your Razer devices. Here’s how to get started:
- Visit Razer Mac OS GitHub: Since the software isn’t available in the App Store, head over to the GitHub page for Razer Mac OS.
- Check Compatibility: Before proceeding, take a moment to review the list of compatible devices on the GitHub page. Ensure that your Razer device is supported, as Razer is not officially supported on Mac OS.
- Download the Latest Release: Under the “Download” section on the GitHub page, click on the latest release to download the file. This will take you to a secondary page with release information and assets. Download the latest DMG file.
- Install the Software: Open the DMG file and follow the standard Mac installation process by dragging the icon into the Applications folder and opening it via Finder.
- Security Popup: When you first open the software, you’ll receive a security pop-up notifying you that it was downloaded from the internet. Click “Open Anyway” to proceed.
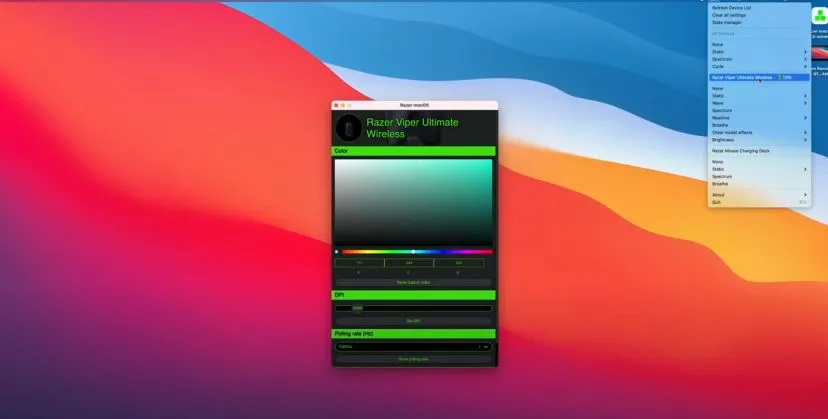
- Connect Your Razer Device: Ensure your Razer device is connected, and then click on the Razer Mac OS icon in your menu bar. You should now see your device within Razer Mac OS.
Here, you can set RGB lighting effects, polling rate, and DPI settings for your mouse. The best part is that your RGB lighting settings are saved to the device’s onboard memory, so you don’t have to reconfigure them every time you reconnect.
To set a custom color for your device, follow these steps:
- Click into the device you want to customize.
- Choose your color in the color picker.
- Save the custom color.
- Go back to the dropdown under “Static” and select “Custom Color.”
Congratulations! Your RGB lighting is now set up and ready to go.
Customizing Button Bindings with Better Touch Tools
However, we’re not done yet. To fully customize your Razer mouse and keyboard on your Mac, including the button bindings, we’ll use a third-party program called Better Touch Tools. Here’s how to proceed:
- Visit Better Touch Tools Website: Head over to the Better Touch Tools website.
- Download the Trial: It’s recommended to start with the 45-day trial to ensure compatibility with your devices and Mac OS.
- Open Better Touch Tools: When you open the software, you’ll see a security prompt similar to the one you encountered for Razer Mac OS. Click “Open” to proceed.
- Access to Finder Control: You’ll receive a privacy pop-up granting Better Touch Tools access to control Finder. Click “OK” to enable this functionality.
- Data Privacy Pop-Up: Click “Continue” on the data privacy pop-up.
- Start Using BTT: Click on “Start using BTT” to open the preferences.
Now, to set up key bindings for your mouse, follow these steps:
- Click the drop-down button on top and select “Normal Mouse.”
- Click the plus icon to add a shortcut.
- Hover over the box that says “Please select a trigger” and select the button on your mouse you want to customize.
- Click on the blank space to open the “Assign First Action” window.
- Click the plus icon to choose an action, like assigning a function from the Mac OS functionality tab.
Repeat these steps for each button on your mouse, customizing them to your preferences.
With Better Touch Tools, you’ll have fully functional Razer devices with RGB lighting and customized button bindings on your Mac OS. If you need further assistance or have questions about Razer Mac OS, Better Touch Tools, or any alternative solutions, feel free to ask in the comments. We’re here to help you make the most of your Razer products on your Mac OS device.
Prefer to watch videos?
The Advantages of Using Razer Products on Mac
Now that you’ve successfully set up your Razer devices on your Mac, let’s dive deeper into the advantages of using Razer products in a Mac environment. Razer is renowned for its high-performance gaming peripherals, but these advantages extend beyond just gaming. Here’s why integrating Razer products with your Mac can enhance your overall computing experience.
1. Superior Build Quality
Razer products are known for their exceptional build quality. Whether it’s a gaming mouse, keyboard, or headset, Razer consistently delivers durable and premium-feeling peripherals. This level of quality ensures that your Razer device will withstand the rigors of everyday use and gaming sessions.
2. Customizable RGB Lighting
Razer is synonymous with RGB lighting customization. With Razer Synapse software, you can personalize your device’s lighting to match your aesthetic preferences. Whether you prefer a subtle glow or a dazzling light show, Razer products offer extensive RGB options to elevate your setup’s visual appeal.
3. Advanced Sensor Technology
Razer’s gaming mice are equipped with advanced sensor technology, providing precise tracking and responsiveness. This advantage isn’t limited to gaming; it enhances productivity as well. The accuracy and speed of Razer mice make tasks like graphic design, video editing, and general navigation smoother and more efficient.
4. Programmable Macros
Razer Synapse allows you to program macros, turning your Razer keyboard or mouse into a productivity powerhouse. Whether you’re streamlining repetitive tasks or creating complex shortcuts, macros can save you time and effort during your workday.
5. Ergonomic Design
Razer pays careful attention to ergonomics, ensuring that their devices are comfortable for long periods of use. The ergonomic design is beneficial not only for gamers who engage in marathon gaming sessions but also for professionals who spend hours at their computers daily.
6. Integration with macOS
While Razer may not have official support for Mac OS, the third-party solutions we discussed earlier bridge this gap. With Razer Mac OS and Better Touch Tools, you can fully utilize your Razer peripherals on your Mac, making them compatible with macOS’s unique features and functionality.
7. Immersive Audio
Razer also offers high-quality audio products, such as the Razer Nari headset series. These headsets provide immersive soundscapes for gaming, but they also excel in delivering crystal-clear audio for virtual meetings, content creation, and entertainment.
8. Gaming and Beyond
While Razer products are optimized for gaming, they are versatile enough to enhance your Mac experience across various applications. From video editing with precision mice to immersive audio for multimedia consumption, Razer products extend their benefits beyond the gaming realm.
9. Community and Support
Razer boasts a vibrant online community, providing resources, tips, and user-generated content. If you ever encounter issues or want to explore creative ways to use your Razer gear, you’ll find a supportive community ready to assist.
Conclusion
Integrating Razer products with your Mac is a smart choice for anyone seeking high-performance peripherals that enhance both gaming and productivity. With the right software solutions, you can enjoy the full potential of your Razer devices on your Mac OS, from customizable RGB lighting to programmable macros. Embrace the advantages of superior build quality, ergonomic design, and advanced sensor technology.
So, whether you’re a gamer looking to dominate the virtual battlefield or a professional seeking efficient tools for work, Razer products have you covered. With a little setup and customization, you’ll unlock the true potential of your Razer peripherals on your Mac. Experience the best of both worlds – the power of Razer and the versatility of macOS.
Thank you for embarking on this journey to optimize your Razer products for Mac. We hope this comprehensive guide has equipped you with the knowledge and tools needed to make the most of your Razer peripherals in your Mac OS environment. Enjoy your enhanced computing experience, and may your Razer products empower you in all your endeavors.
Frequently Asked Questions (FAQs)
Is it possible to use Razer products on Mac without third-party software?
While Razer products are primarily designed for Windows, third-party software like Razer Mac OS and Better Touch Tools can bridge the compatibility gap. These tools enable you to use your Razer peripherals to their full potential on Mac.
Can I use Razer Synapse on Mac?
Razer Synapse, the official software for configuring Razer devices, is not available for Mac. However, the third-party solutions mentioned in this guide provide similar functionality for Mac users.
Are Razer products suitable for professional use on Mac?
Absolutely! Razer’s high-quality build, precise sensor technology, and ergonomic design make their products suitable for professional tasks on Mac. They excel in areas such as graphic design, video editing, and general productivity.
How do I troubleshoot Razer product issues on Mac?
If you encounter any issues with your Razer products on Mac, start by checking for software updates for both Razer Mac OS and Better Touch Tools. You can also seek assistance from the Razer community, which offers valuable troubleshooting tips.
Can I use Razer products for content creation on Mac?
Yes, Razer peripherals can enhance content creation on Mac. For example, programmable macros on Razer keyboards and mice can streamline repetitive tasks in video editing or graphic design software.
What Razer audio products are compatible with Mac?
Razer audio products like the Razer Nari headset series are compatible with Mac. They provide immersive audio experiences for gaming and multimedia consumption on Mac OS.
How can I stay updated on Razer product compatibility with Mac OS?
To stay informed about Razer product compatibility with Mac OS, regularly check the Razer website and community forums for updates and announcements regarding Mac support.
Are there any free alternatives to Better Touch Tools for customizing Razer devices on Mac?
While Better Touch Tools is a highly recommended tool for customizing Razer devices on Mac, some free alternatives like Karabiner-Elements exist. However, these alternatives may not offer the same level of compatibility and features as Better Touch Tools.
Can I use Razer products for gaming on Mac?
Yes, Razer products are suitable for gaming on Mac. With the right software setup, you can enjoy an enhanced gaming experience on your Mac using Razer peripherals.
Are Razer products compatible with the latest versions of Mac OS?
Compatibility may vary depending on the specific Razer product and the version of Mac OS you’re using. It’s advisable to check for software updates and compatibility information on the Razer website to ensure optimal performance with the latest Mac OS releases.
I have spent thousands of hours playing various types of games ranging from FPS, MOBA, RPG, MMO, and many more. I also still actively play some of my favorite games such as Dota 2. Valorant, Apex Legend, Clash of Clans, D&D 5e, AFK Arena, Mobile Legends, Free Fire, PUBG PC/Mobile, and many more…
